PlayStation 4 CUH-1200 Entire Console Disassembly (2024)

Introduction

Sony now has 3 different models of its PS4 game console. This is the latest version and it has been changed a lot. We tore it apart to see what's different.

*Please note: You are using this guide at your own risk. TronicsFix take no responsibility and will not be held liable for any damages that may occur while using this guide.

What you need

  1. Step 1 Unboxing the PS4 CUH-1200

    PlayStation 4 CUH-1200 Entire Console Disassembly (1) PlayStation 4 CUH-1200 Entire Console Disassembly (2) PlayStation 4 CUH-1200 Entire Console Disassembly (3)

    PlayStation 4 CUH-1200 Entire Console Disassembly (4)

    PlayStation 4 CUH-1200 Entire Console Disassembly (5)

    PlayStation 4 CUH-1200 Entire Console Disassembly (6)

    • CUH-1200A Unboxing

    Edit

  2. Step 2 Let's get this thing torn down!

    PlayStation 4 CUH-1200 Entire Console Disassembly (7)

    • The hard drive cover slides off just like on previous models.

    Edit

  3. Step 3 Remove Hard Drive

    PlayStation 4 CUH-1200 Entire Console Disassembly (8) PlayStation 4 CUH-1200 Entire Console Disassembly (9) PlayStation 4 CUH-1200 Entire Console Disassembly (10)

    PlayStation 4 CUH-1200 Entire Console Disassembly (11)

    PlayStation 4 CUH-1200 Entire Console Disassembly (12)

    PlayStation 4 CUH-1200 Entire Console Disassembly (13)

    • The hard drive has one screw that needs to come out then it slides right out.

    • You'll need a PH 0 screwdriver for this step.

    Edit

  4. Step 4 Remove Warranty Stickers - Our Favorite Part!

    PlayStation 4 CUH-1200 Entire Console Disassembly (14) PlayStation 4 CUH-1200 Entire Console Disassembly (15)

    PlayStation 4 CUH-1200 Entire Console Disassembly (16)

    PlayStation 4 CUH-1200 Entire Console Disassembly (17)

    • Using a pick or something similar, peel off the warranty stickers to reveal two black T9 security torx screws.

    • Remove the two T9 security torx screws.

    • This is the first major revision we find...there are only two screws that hold the plastics on. The previous models had four.

    Edit

  5. Step 5 Remove Top Cover

    PlayStation 4 CUH-1200 Entire Console Disassembly (18) PlayStation 4 CUH-1200 Entire Console Disassembly (19) PlayStation 4 CUH-1200 Entire Console Disassembly (20)

    PlayStation 4 CUH-1200 Entire Console Disassembly (21)

    PlayStation 4 CUH-1200 Entire Console Disassembly (22)

    PlayStation 4 CUH-1200 Entire Console Disassembly (23)

    • FIRST remove the two screws securing the top cover to the PS4. Removing the top cover will be easier if you follow these steps in order:

    • 1) Grab underneath of the top cover near the power button.

    • 2) Pull up...you will hear it click or snap as you pull up.

    • 3) Move your hand over to the opposite side of the top cover and pull up here as well.

    • 4) After puling up both sides of the top cover it should now slide back and off of the PS4.

    • We now have our first view of the inside of the CUH 1200. The first thing we notice is that the motherboard is much, much smaller and the APU clamp has been completely redesigned. The inside of this model is completely different than previous models.

    Edit

  6. Step 6 Remove Bottom Cover

    PlayStation 4 CUH-1200 Entire Console Disassembly (24) PlayStation 4 CUH-1200 Entire Console Disassembly (25) PlayStation 4 CUH-1200 Entire Console Disassembly (26)

    PlayStation 4 CUH-1200 Entire Console Disassembly (27)

    PlayStation 4 CUH-1200 Entire Console Disassembly (28)

    PlayStation 4 CUH-1200 Entire Console Disassembly (29)

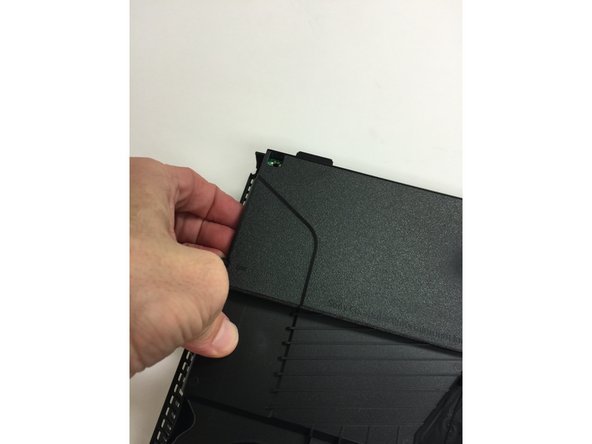
    • To remove the bottom cover you'll need to pull up very hard on each side of the cover near the back of the console.

    • You may be able to pull just with your hands but you might also need to use some opening tools to pry it off.

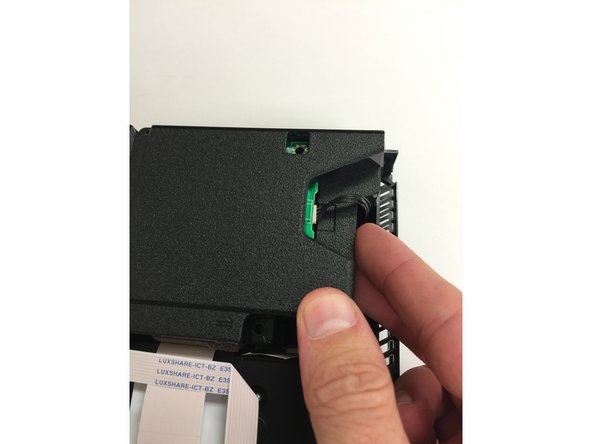
    • We get our first view of the components on the underside of the console. Looks like we have a redesigned power supply and optical drive.

    Edit

  7. Step 7 Notice the Buttons!

    PlayStation 4 CUH-1200 Entire Console Disassembly (30) PlayStation 4 CUH-1200 Entire Console Disassembly (31)

    PlayStation 4 CUH-1200 Entire Console Disassembly (32)

    PlayStation 4 CUH-1200 Entire Console Disassembly (33)

    • After we remove the bottom plastic we see the physical eject button that Sony has decided to use. This is another significant change over the previous models.

    • We're guessing this change is to help prevent the "random ejecting" of discs that plagued the previous models.

    Edit

  8. Step 8 Remove the Power Supply

    PlayStation 4 CUH-1200 Entire Console Disassembly (34) PlayStation 4 CUH-1200 Entire Console Disassembly (35) PlayStation 4 CUH-1200 Entire Console Disassembly (36)

    PlayStation 4 CUH-1200 Entire Console Disassembly (37)

    PlayStation 4 CUH-1200 Entire Console Disassembly (38)

    PlayStation 4 CUH-1200 Entire Console Disassembly (39)

    • Remove the three T9 torx screws then the two phillips PH 0 long screws.

    • Pull up on the left side (the side without the four wires), then on the right side. The right side of the power supply will be harder to pull up on so you'll need to pull firmly.

    • After you get it loose you'll be able to pull it up a bit but it will still be connected by the four wire connector so don't pull it all the way out until that has been disconnected (shown in the next step).

    Edit

  9. Step 9 Remove the Power Supply Connector

    PlayStation 4 CUH-1200 Entire Console Disassembly (40) PlayStation 4 CUH-1200 Entire Console Disassembly (41) PlayStation 4 CUH-1200 Entire Console Disassembly (42)

    PlayStation 4 CUH-1200 Entire Console Disassembly (43)

    PlayStation 4 CUH-1200 Entire Console Disassembly (44)

    PlayStation 4 CUH-1200 Entire Console Disassembly (45)

    • You'll need to disconnect this four wire connector from the motherboard.

    • The best way we've found is to use mini pliers. Pull up on one side then the other. Go back and forth one side at a time until it pops off.

    • The power supply can now be removed.

    • Use caution as this connector is easily pulled off the motherboard.

    • Be sure that you are pulling on the connector for the wires that go to the power supply itself and NOT on the connector on the motherboard.

    Edit

  10. Step 10 Disconnect Wifi Antenna and Optical Drive Cables

    PlayStation 4 CUH-1200 Entire Console Disassembly (46) PlayStation 4 CUH-1200 Entire Console Disassembly (47) PlayStation 4 CUH-1200 Entire Console Disassembly (48)

    PlayStation 4 CUH-1200 Entire Console Disassembly (49)

    PlayStation 4 CUH-1200 Entire Console Disassembly (50)

    PlayStation 4 CUH-1200 Entire Console Disassembly (51)

    • Using the same pliers grasp the WiFi antenna cable and pull up carefully

    • The really wide optical drive cable has a black "collar" that needs to be lifted up on each side. This will free the cable.

    • The other two cables can just be pulled right out of their respective sockets.

    Edit

  11. Step 11 De-route and Remove WiFi Antenna

    PlayStation 4 CUH-1200 Entire Console Disassembly (52) PlayStation 4 CUH-1200 Entire Console Disassembly (53)

    PlayStation 4 CUH-1200 Entire Console Disassembly (54)

    PlayStation 4 CUH-1200 Entire Console Disassembly (55)

    • Remove the T9 security torx screw that secures the WiFi antenna.

    • De-route the WiFi cable.

    Edit

  12. Step 12 Remove Optical Drive

    PlayStation 4 CUH-1200 Entire Console Disassembly (56) PlayStation 4 CUH-1200 Entire Console Disassembly (57) PlayStation 4 CUH-1200 Entire Console Disassembly (58)

    PlayStation 4 CUH-1200 Entire Console Disassembly (59)

    PlayStation 4 CUH-1200 Entire Console Disassembly (60)

    PlayStation 4 CUH-1200 Entire Console Disassembly (61)

    • Remove small ribbon cable from optical drive.

    • Remove five T9 security torx screws

    • Remove two PH 0 phillips screws along with the green PCB board.

    Edit

  13. Step 13 Optical Drive Notes

    PlayStation 4 CUH-1200 Entire Console Disassembly (62) PlayStation 4 CUH-1200 Entire Console Disassembly (63)

    PlayStation 4 CUH-1200 Entire Console Disassembly (64)

    PlayStation 4 CUH-1200 Entire Console Disassembly (65)

    • Even though the optical drive has been redesigned they still use the same roller system with the white bar in between. We're guessing that there will still be problems with these white bars falling out.

    • The laser and carrier look very similar to the previous models.

    Edit

  14. Step 14 Remove Top Metal Shield

    PlayStation 4 CUH-1200 Entire Console Disassembly (66) PlayStation 4 CUH-1200 Entire Console Disassembly (67) PlayStation 4 CUH-1200 Entire Console Disassembly (68)

    PlayStation 4 CUH-1200 Entire Console Disassembly (69)

    PlayStation 4 CUH-1200 Entire Console Disassembly (70)

    PlayStation 4 CUH-1200 Entire Console Disassembly (71)

    • Remove twelve T9 security torx screws

    • Be careful to not lose the small metal nut under the black cover on the top left side. This nut is for one of the two long screws that hold the power supply that was removed in previous steps.

    • Remove six PH 0 phillips screws

    • Remove three PH 0 phillips screws

    • Remove two PH 0 phillips screws

    • Pull the top metal shield off of the console.

    Edit

  15. Step 15 Motherboard Notes

    PlayStation 4 CUH-1200 Entire Console Disassembly (72)

    • The first thing we notice (other than the size) about the motherboard is that Sony has totally re-designed the heat sink clamp. We're guessing (and hoping) this will reduce or eliminate the problem of PS4's turning on then back off.

    Edit

  16. Step 16 Remove Heat Sink Clamp and Power Button

    PlayStation 4 CUH-1200 Entire Console Disassembly (73) PlayStation 4 CUH-1200 Entire Console Disassembly (74) PlayStation 4 CUH-1200 Entire Console Disassembly (75)

    PlayStation 4 CUH-1200 Entire Console Disassembly (76)

    PlayStation 4 CUH-1200 Entire Console Disassembly (77)

    PlayStation 4 CUH-1200 Entire Console Disassembly (78)

    • Remove the two PH 0 phillips screws.

    • After the clamp is removed the spacer under it will also need to be removed.

    • Remove the power button by prying up on the hook that's hooked into the motherboard.

    • After the hook is lifted the button will slide back and out.

    Edit

  17. Step 17 Remove Motherboard

    PlayStation 4 CUH-1200 Entire Console Disassembly (79) PlayStation 4 CUH-1200 Entire Console Disassembly (80) PlayStation 4 CUH-1200 Entire Console Disassembly (81)

    PlayStation 4 CUH-1200 Entire Console Disassembly (82)

    PlayStation 4 CUH-1200 Entire Console Disassembly (83)

    PlayStation 4 CUH-1200 Entire Console Disassembly (84)

    • As you lift up on the front of the motherboard you will notice that the fan is still plugged in. This can be removed by grasping the connector with a pair of small pliers.

    • After that is removed the motherboard will lift out.

    Edit

  18. Step 18 Motherboard Notes

    PlayStation 4 CUH-1200 Entire Console Disassembly (85) PlayStation 4 CUH-1200 Entire Console Disassembly (86)

    PlayStation 4 CUH-1200 Entire Console Disassembly (87)

    PlayStation 4 CUH-1200 Entire Console Disassembly (88)

    • We can now see one of the huge differences between the older models and this new model...there's no RAM on one side of the motherboard!

    • There is still the same amount of RAM but the total number of RAM chips has been cut in half.

    • In other news, the HDMI port has finally been redesigned! This is great news as the old style is very prone to failure.

    Edit

  19. Step 19 Remove Fan

    PlayStation 4 CUH-1200 Entire Console Disassembly (89) PlayStation 4 CUH-1200 Entire Console Disassembly (90) PlayStation 4 CUH-1200 Entire Console Disassembly (91)

    PlayStation 4 CUH-1200 Entire Console Disassembly (92)

    PlayStation 4 CUH-1200 Entire Console Disassembly (93)

    PlayStation 4 CUH-1200 Entire Console Disassembly (94)

    • Remove three PH 0 phillips screws then remove the metal piece.

    • With that gone there is only one screw (PH 0) holding the fan in. Remove it and you're done!

    Edit

  20. Step 20 Loose Piece Warning!

    PlayStation 4 CUH-1200 Entire Console Disassembly (95) PlayStation 4 CUH-1200 Entire Console Disassembly (96)

    PlayStation 4 CUH-1200 Entire Console Disassembly (97)

    PlayStation 4 CUH-1200 Entire Console Disassembly (98)

    • As we started assembling this PS4 we noticed this small piece laying in on the bottom metal sheet. As we reassembled the console we found that it went on the top of the motherboard where one of the long power supply screws goes it. There is a black plastic piece that will cover it.

    Edit

  21. Step 21 Conclusion

    PlayStation 4 CUH-1200 Entire Console Disassembly (99)

    • With this drastically different model of PS4 we are hoping that Sony has addressed some of the problems with the older models (HDMI port, etc). We are cautiously optimistic that they have.

    Edit

Almost done!

Finish Line

Cancel: I did not complete this guide.

161 other people completed this guide.

Author

with 7 other contributors

TronicsFix

Member since: 11/06/13

34,924 Reputation

5 Guides authored

Badges: 33

+30 more badges

Team

TronicsFix Member of TronicsFix

Business

1 Member

21 Guides authored

78 Comments

You didn't show what the supply connector is supposed to look like, when disconnected. Now I ripped it off of my mother board, attempting to assess milk damage. Thanks for helping me make sure my PS4 will stay broken.

draconicfeathers - Feb 4, 2016 Reply

I'm so sorry it ripped off. I'm assuming you are talking about the power supply connector? If so step #10 shows the method we use to remove this connector. We use mini pliers and grasp one end at a time and pull up gently but firmly each time...this will eventually get the connector off without damage in most cases. That being said we have had to fix a connector every once in a while on these because some of them are fragile.

TronicsFix - Feb 4, 2016

I ripped off my power supply from the motherboard too, assuming that from these photos that was where I was supposed to pull. Playstation is very broken now.

taylah.sewell - May 17, 2020

Same here. I really don’t know what I’m supposed to do now.

Florent Krasniqi - Nov 14, 2020

i dropped my ps4 and it made grinding noises when it reading discs and also it wouldnt eject disc, i fixed the eject problem by disassembling the blu ray drive but it still grinds when reading and only reads when i rebuild database. are you guys gonna start selling replacements anytime soon or will the blu ray from the cuh-11xx models work?

jer - Feb 14, 2016 Reply

PlayStation 4 CUH-1200 Entire Console Disassembly (2024)

References

Top Articles
Infinite Campus West Ottawa
Search Results - Obituaries published on Winnipeg Free Press Passages
Vacature Ergotherapeut voor de opname- en behandelafdeling Psychosenzorg Brugge; Vzw gezondheidszorg bermhertigheid jesu
Ap Psychology Unit 8 Vocab
One Hour Rosemary Focaccia Bread
Chevrolet Colorado - Infos, Preise, Alternativen
Castle Nail Spa (Plano)
Craig Woolard Net Worth
Wgu Academy Phone Number
Bank Of America Operating Hours Today
Jet Ski Rental Conneaut Lake Pa
Lakeport Craigslist
Weather Channel Quincy
C.J. Stroud und Bryce Young: Zwei völlig unterschiedliche Geschichten
Who is Ariana Grande? Everything You Need to Know
Jacy Nittolo Ex Husband
73 87 Chevy Truck Air Conditioning Wiring Diagram
The Courier from Waterloo, Iowa
Black Panther Pitbull Puppy For Sale
What Times What Equals 82
Female Same Size Vore Thread
All Added and Removed Players in NBA 2K25 (Help Us Catch 'Em All)
Money Rose Stencil
Cato's Dozen Crossword
Emojiology: 🤡 Clown Face
How to Get Into UCLA Medical School: Requirements and Strategies — Shemmassian Academic Consulting
Logisticare Transportation Provider Login
5162635626
ONE PAN BROCCOLI CASHEW CHICKEN
Search results for: Kert\u00E9sz, Andr\u00E9, page 1
Mcdonald Hours Near Me
Small Party Hall Near Me
SimpliSafe Home Security Review: Still a Top DIY Choice
Grave Digger Wynncraft
Hux Lipford Funeral
Walgreens Rufe Snow Hightower
Helas Kitchen Menu
Alaska State Troopers Dispatch
Oklahoma Craigslist Pets
Voyeur Mature Bikini
Fgo Rabbit Review
Los Alamos Beach in Torremolinos: A Perfect Mediterranean Escape - Mama Málaga
Mbta Commuter Rail Schedule Newburyport
Molly Leach from Molly’s Artistry Demonstrates Amazing Rings in Acryli
7Ohp7
Webworx Call Management
Research Tome Neltharus
Ukg Dimensions Urmc
Espn Masters Leaderboard
Central routs Northland in Wisconsin volleyball tournament - Central College Athletics
Wis International Intranet
Vizio 75 Inch Tv Weight
Latest Posts
Article information

Author: Virgilio Hermann JD

Last Updated:

Views: 6408

Rating: 4 / 5 (61 voted)

Reviews: 84% of readers found this page helpful

Author information

Name: Virgilio Hermann JD

Birthday: 1997-12-21

Address: 6946 Schoen Cove, Sipesshire, MO 55944

Phone: +3763365785260

Job: Accounting Engineer

Hobby: Web surfing, Rafting, Dowsing, Stand-up comedy, Ghost hunting, Swimming, Amateur radio

Introduction: My name is Virgilio Hermann JD, I am a fine, gifted, beautiful, encouraging, kind, talented, zealous person who loves writing and wants to share my knowledge and understanding with you.